# Anleitung Kla.TV Hoodie bedrucken lassen

### <span style="background-color: rgb(248, 202, 198);">VORBEREITUNGEN</span>

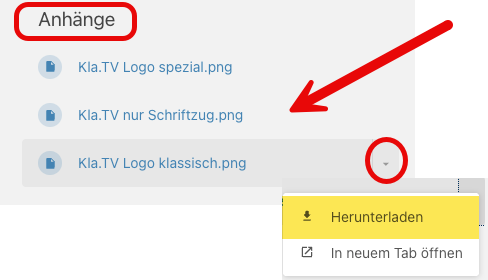
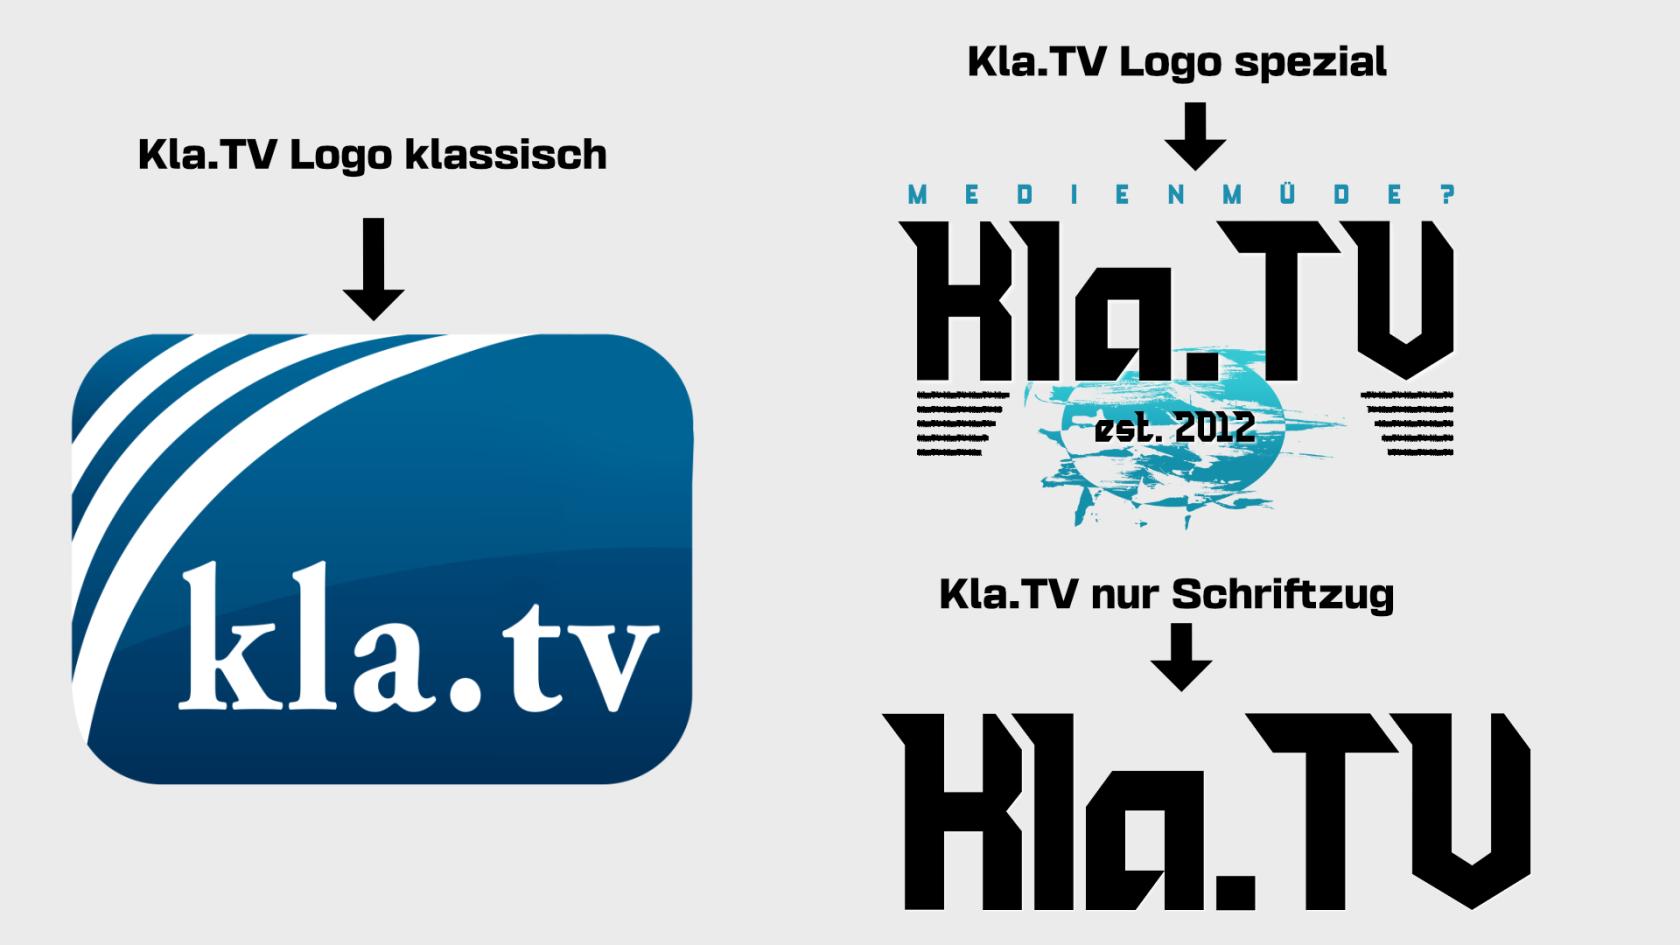
##### <span style="background-color: rgb(251, 238, 184);">**1. Wähle eines von den drei Logos. Lade es dir auf der linken Seite dieses Artikels, bei "Anhänge" herunter.**</span>  


[![image.png](https://wiki.kla.tv/uploads/images/gallery/2026-08/scaled-1680-/eLaX2XwtVQY048Jz-image.png)](https://wiki.kla.tv/uploads/images/gallery/2026-08/eLaX2XwtVQY048Jz-image.png)

[![Kla.TV verschiedene Logos.jpg](https://wiki.kla.tv/uploads/images/gallery/2026-08/scaled-1680-/XtFISqPQy2huIBjY-kla-tv-verschiedene-logos.jpg)](https://wiki.kla.tv/uploads/images/gallery/2026-08/XtFISqPQy2huIBjY-kla-tv-verschiedene-logos.jpg)
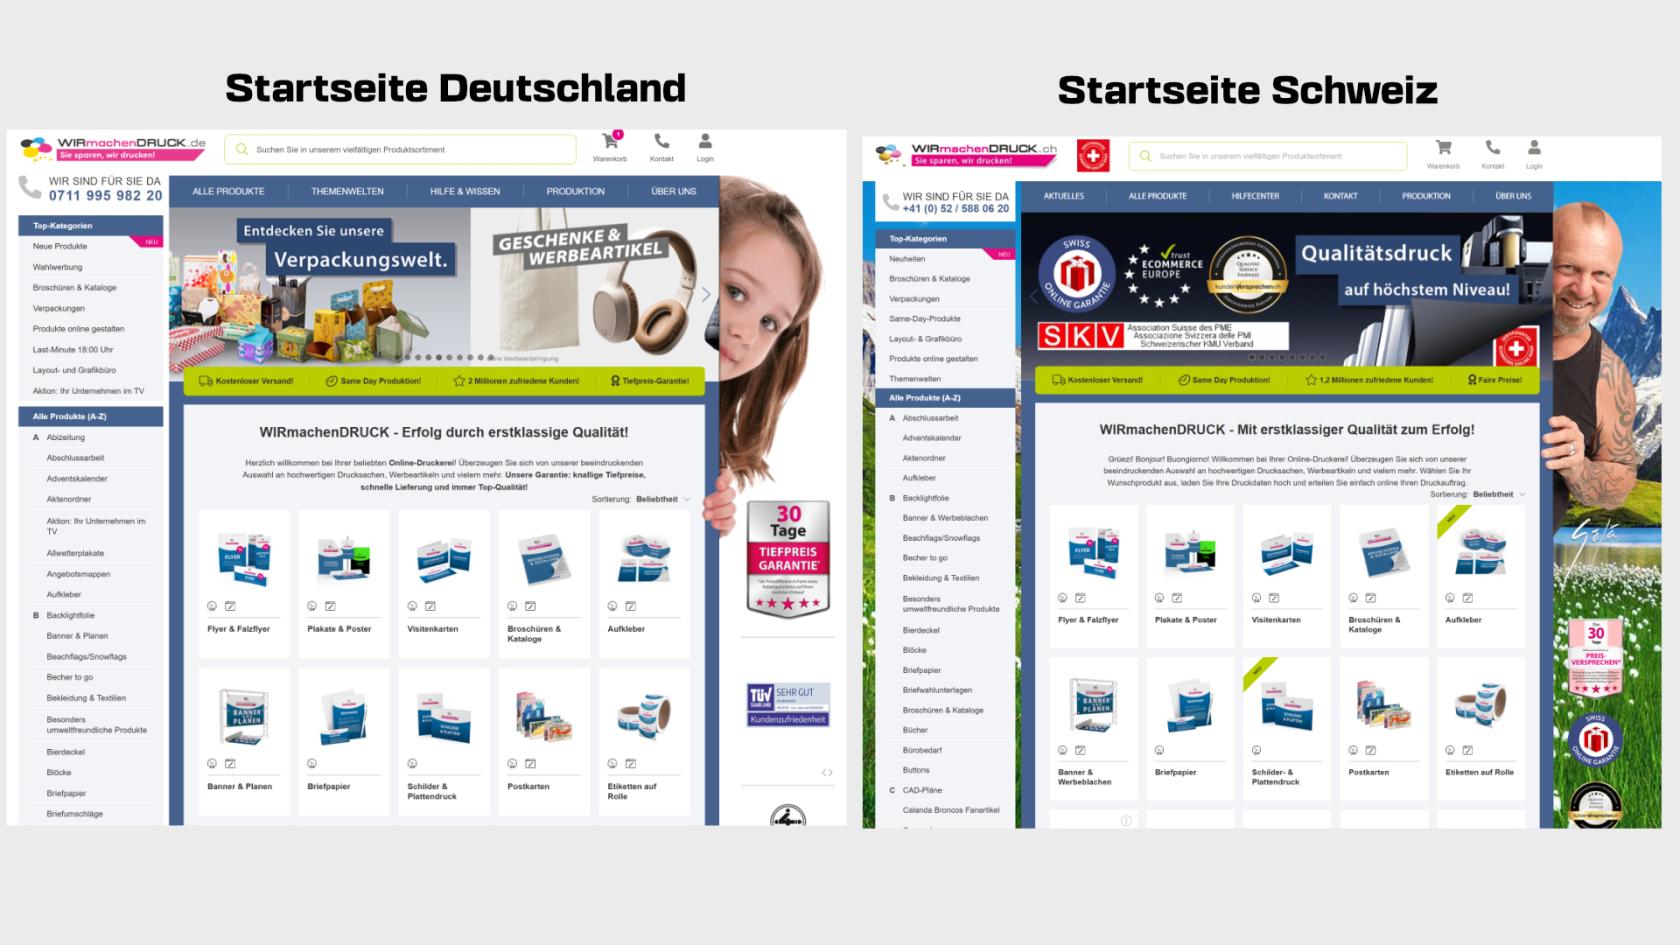
##### <span style="background-color: rgb(251, 238, 184);">**2. Öffne die passende Seite um dein T-Shirt bedrucken zu lassen:**</span>

- Wenn du aus der **Schweiz** kommst, öffne diesen Link: [https://www.wir-machen-druck.ch/](https://www.wir-machen-druck.ch/)
- 
- Wenn du aus **Deutschland** kommst, öffne diesen Link: [https://www.wir-machen-druck.de/](https://www.wir-machen-druck.de/)

[![Startseite.jpg](https://wiki.kla.tv/uploads/images/gallery/2026-08/scaled-1680-/i0yq1r2pwmMF4Nw1-startseite.jpg)](https://wiki.kla.tv/uploads/images/gallery/2026-08/i0yq1r2pwmMF4Nw1-startseite.jpg)
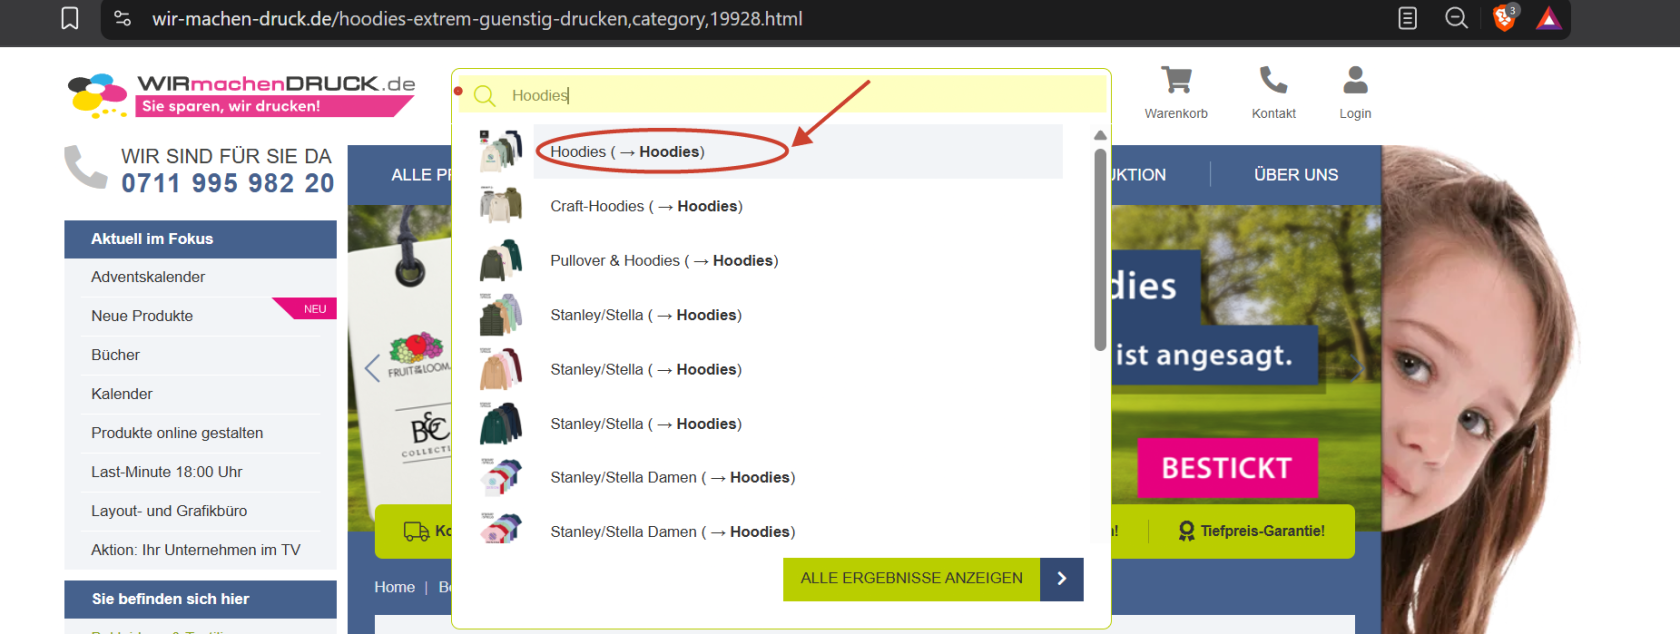
##### <span style="background-color: rgb(251, 238, 184);">**3. Gebe in die Suchleiste "Hoodies" ein und klicke auf das oberste Ergebnis.**</span>

[![3. Schritt Suchleiste.png](https://wiki.kla.tv/uploads/images/gallery/2026-09/scaled-1680-/dXTc7eOlOiO0aK9j-3-schritt-suchleiste.png)](https://wiki.kla.tv/uploads/images/gallery/2026-09/dXTc7eOlOiO0aK9j-3-schritt-suchleiste.png)

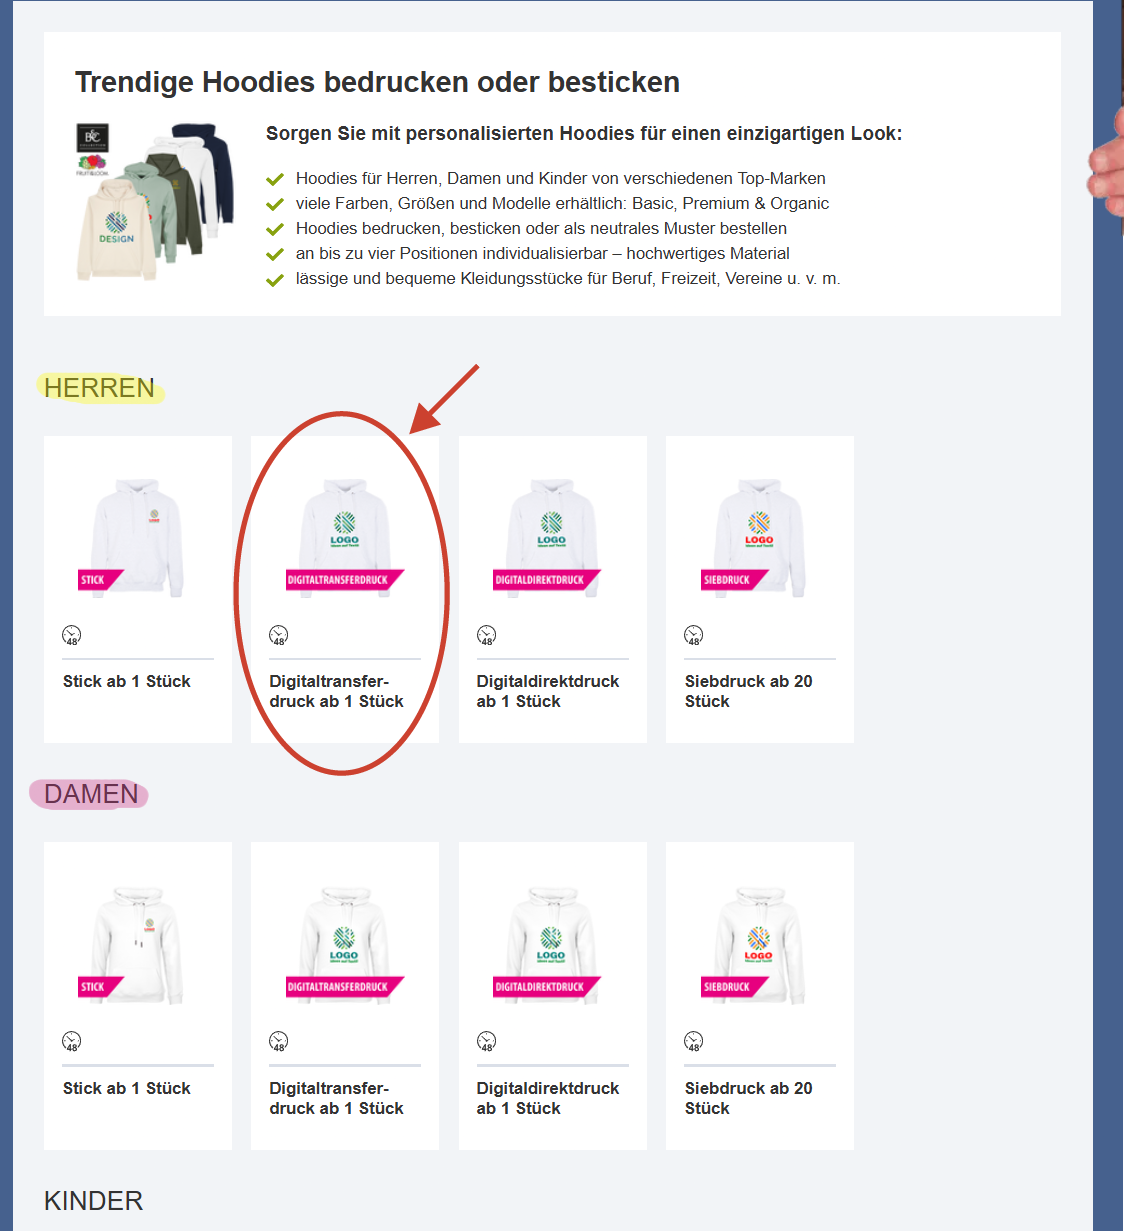
##### <span style="background-color: rgb(251, 238, 184);">**4. Klicke auf die Kachel Hoodie Digitaltransferdruck Herren/Damen**</span>

[![4. Schritt Digitaltransferdruck.png](https://wiki.kla.tv/uploads/images/gallery/2026-09/scaled-1680-/h7YcoRL2dmqE942z-4-schritt-digitaltransferdruck.png)](https://wiki.kla.tv/uploads/images/gallery/2026-09/h7YcoRL2dmqE942z-4-schritt-digitaltransferdruck.png)

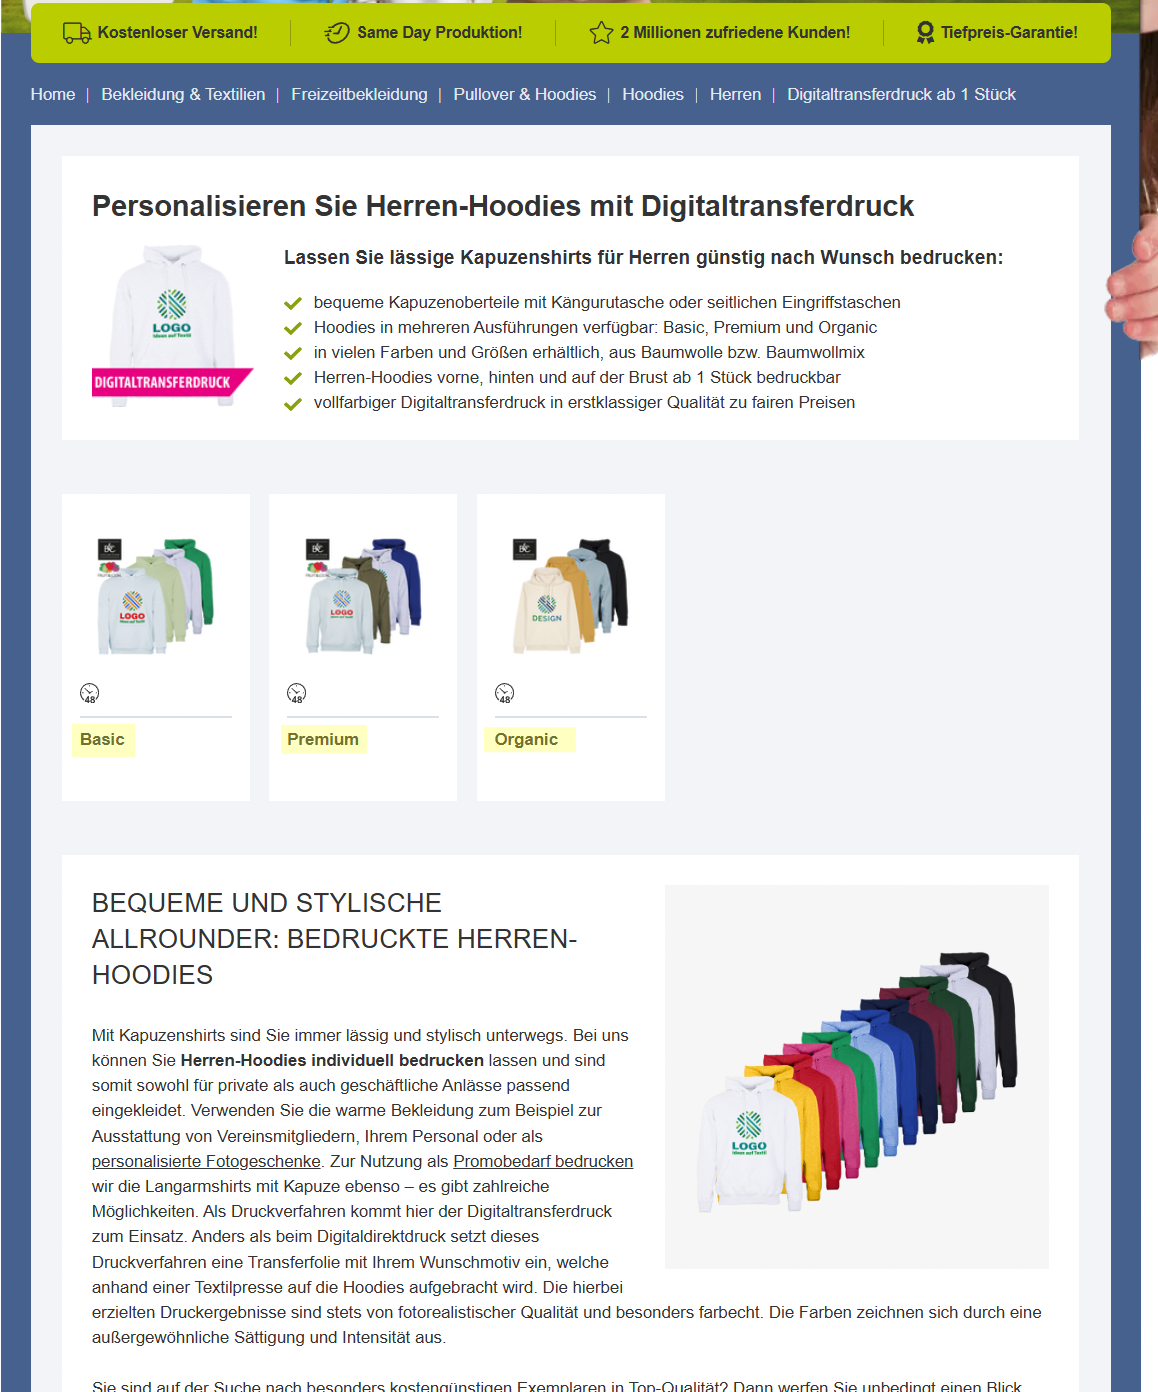
##### <span style="background-color: rgb(251, 238, 184);">**5. Entscheide dich für Qualität und Stoff den Pullovers und klicke dann auf die entsprechende Wahl**</span>

##### **Preisliste:** 

<span style="background-color: rgb(191, 237, 210);">Basic: ab **20,29 Euro**</span>

<span style="background-color: rgb(248, 202, 198);">Premium: ab **27,72 Euro**</span>

<span style="background-color: rgb(251, 238, 184);">Organic: ab **26,48 Euro**</span>

[![5. Schritt Qualität.png](https://wiki.kla.tv/uploads/images/gallery/2026-09/scaled-1680-/yGMJh8olA1h0Sx8K-5-schritt-qualitat.png)](https://wiki.kla.tv/uploads/images/gallery/2026-09/yGMJh8olA1h0Sx8K-5-schritt-qualitat.png)

### <span style="background-color: rgb(248, 202, 198);">BEISPIEL 1</span>

##### <span style="background-color: rgb(251, 238, 184);">**1.Einseitiger Druck**</span>

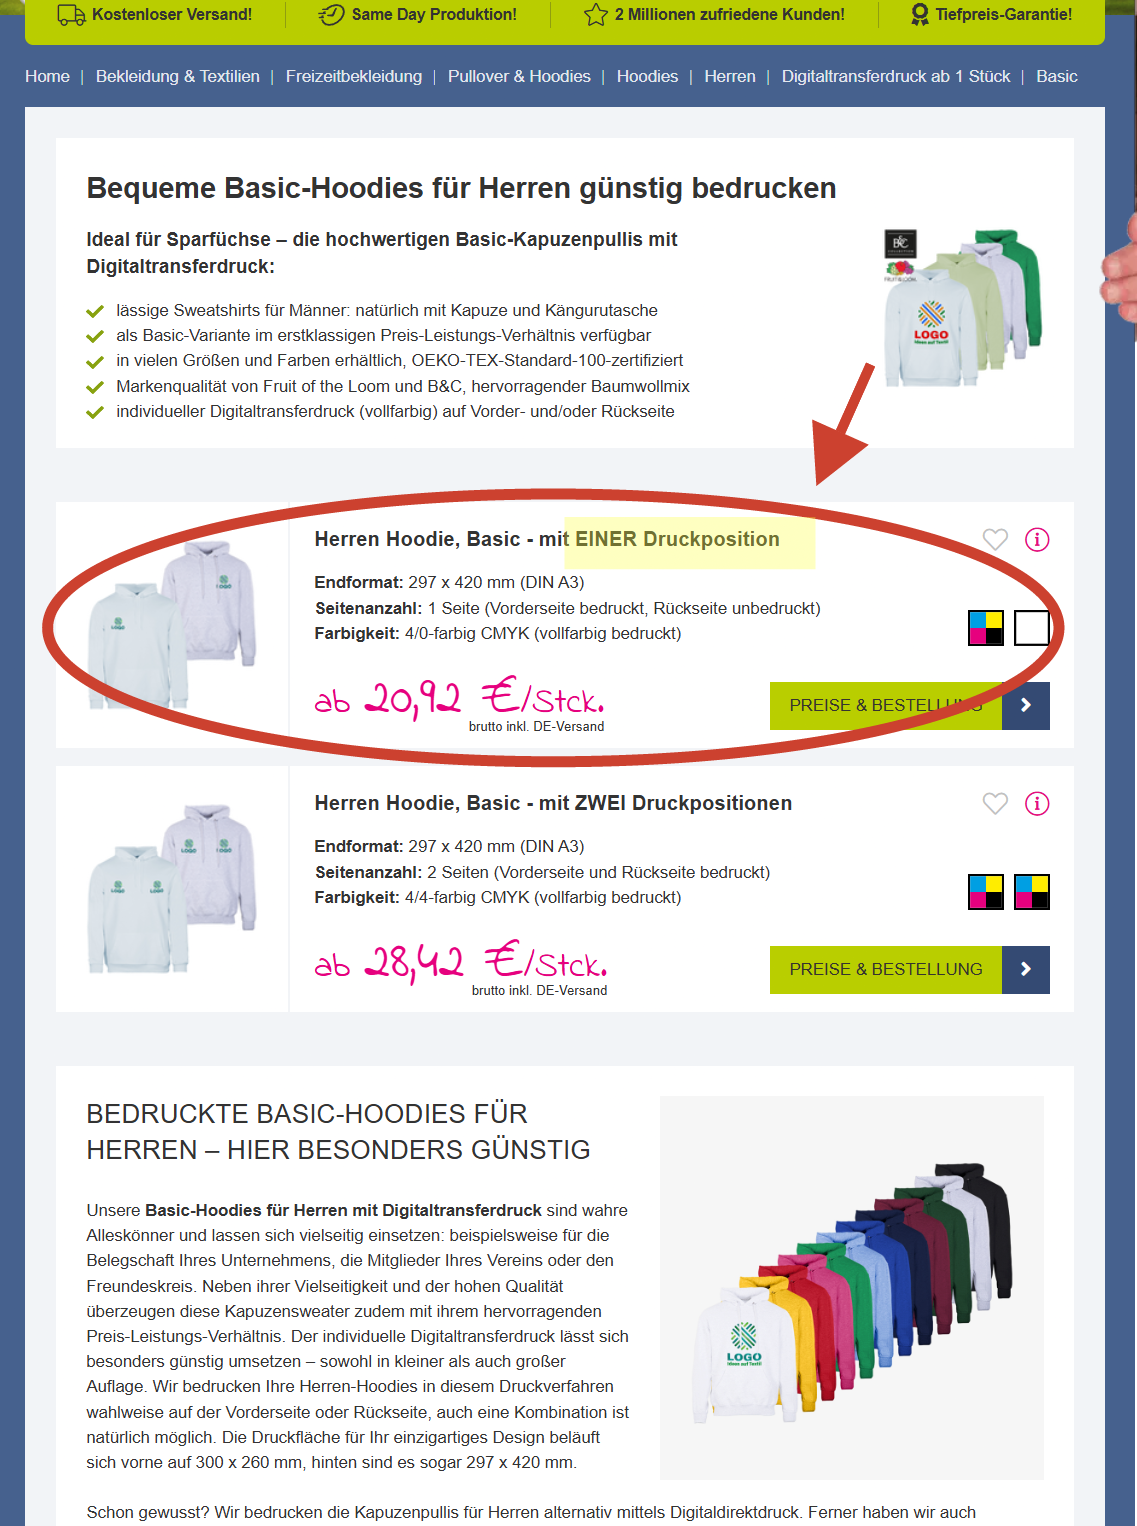
[![6.1. Schritt 1 Druckpositionen.png](https://wiki.kla.tv/uploads/images/gallery/2026-09/scaled-1680-/sp7dNtWwfE6uFcJ6-6-1-schritt-1-druckpositionen.png)](https://wiki.kla.tv/uploads/images/gallery/2026-09/sp7dNtWwfE6uFcJ6-6-1-schritt-1-druckpositionen.png)

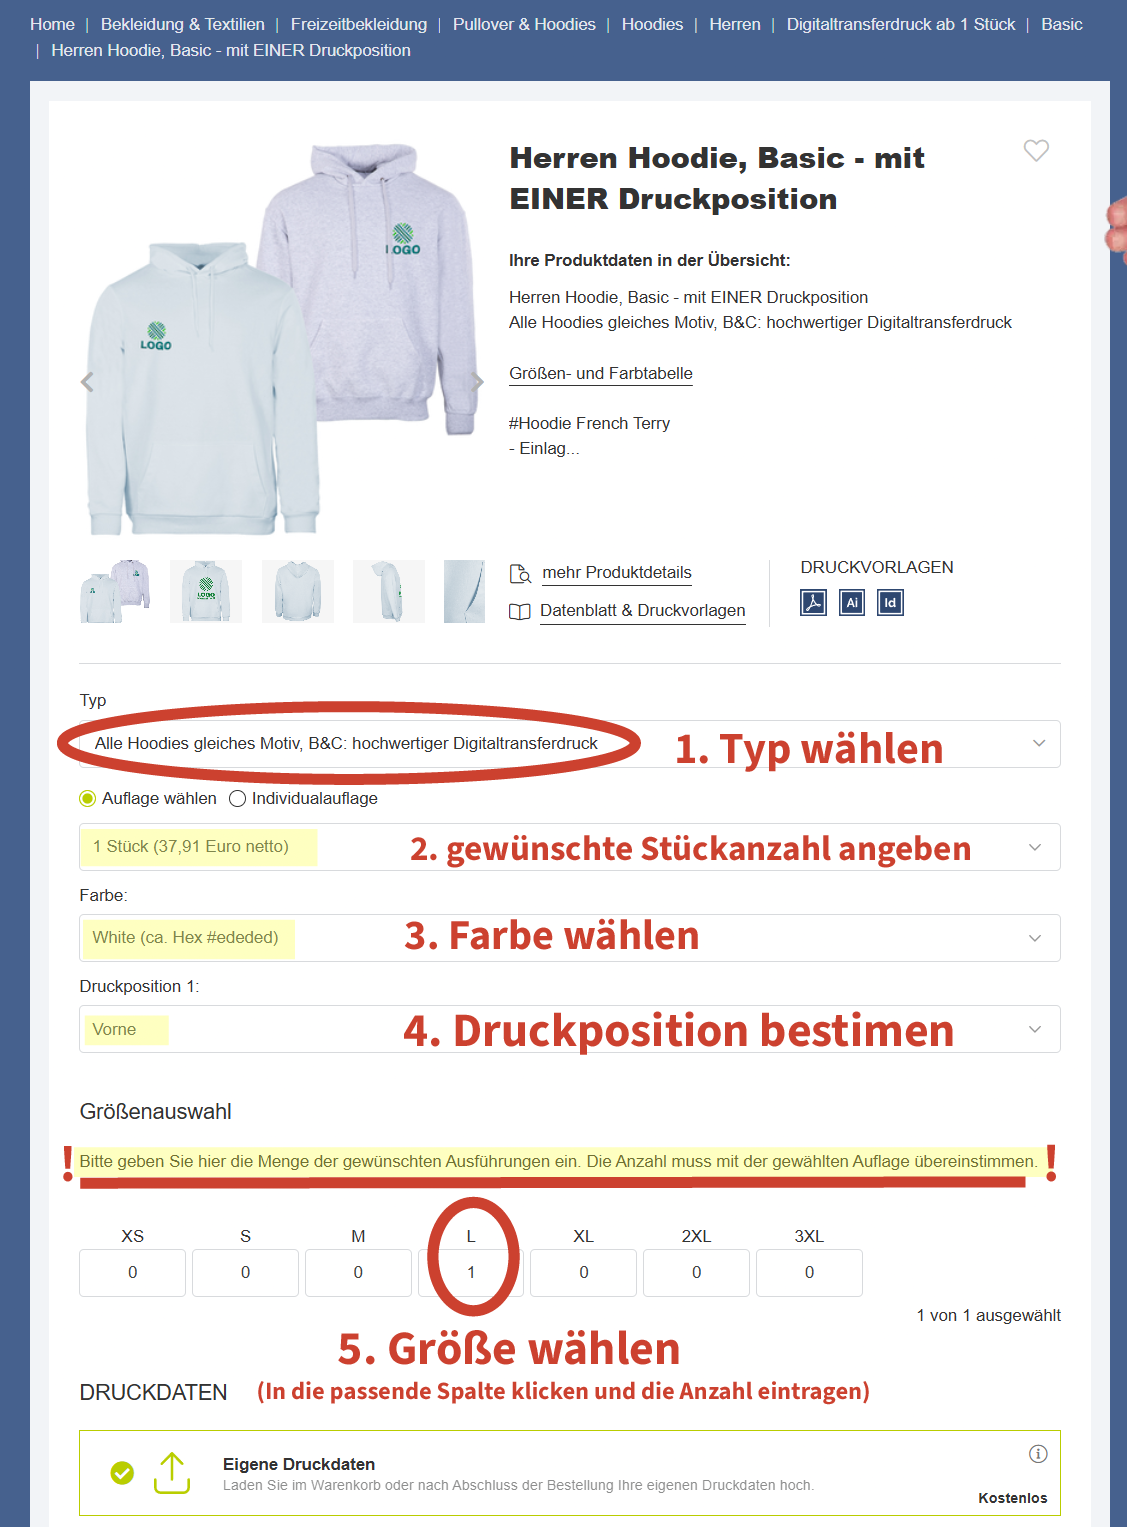
##### <span style="background-color: rgb(251, 238, 184);">**2. Hoodie gestalten**</span>

[![6.2. Schritt Einzelheiten.png](https://wiki.kla.tv/uploads/images/gallery/2026-09/scaled-1680-/X153BGNRORyzhLIo-6-2-schritt-einzelheiten.png)](https://wiki.kla.tv/uploads/images/gallery/2026-09/X153BGNRORyzhLIo-6-2-schritt-einzelheiten.png)

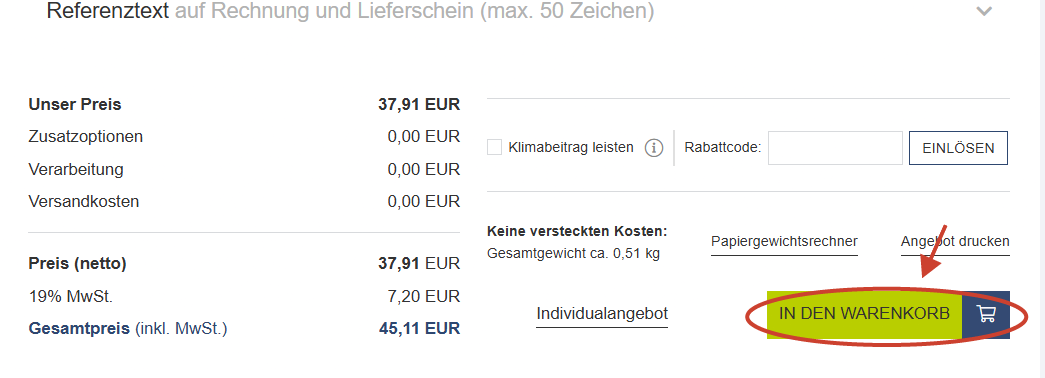
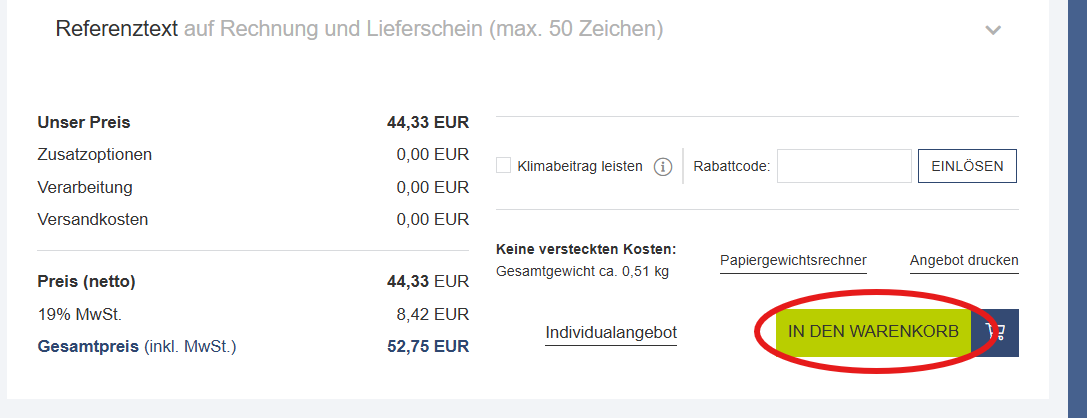
##### <span style="background-color: rgb(251, 238, 184);">**3. Scrolle hinunter und klicke auf "In den Warenkorb"** </span>

[![6.3. Schritt Warenkorb.png](https://wiki.kla.tv/uploads/images/gallery/2026-09/scaled-1680-/wSGdaH4fuj6IQ8Ku-6-3-schritt-warenkorb.png)](https://wiki.kla.tv/uploads/images/gallery/2026-09/wSGdaH4fuj6IQ8Ku-6-3-schritt-warenkorb.png)

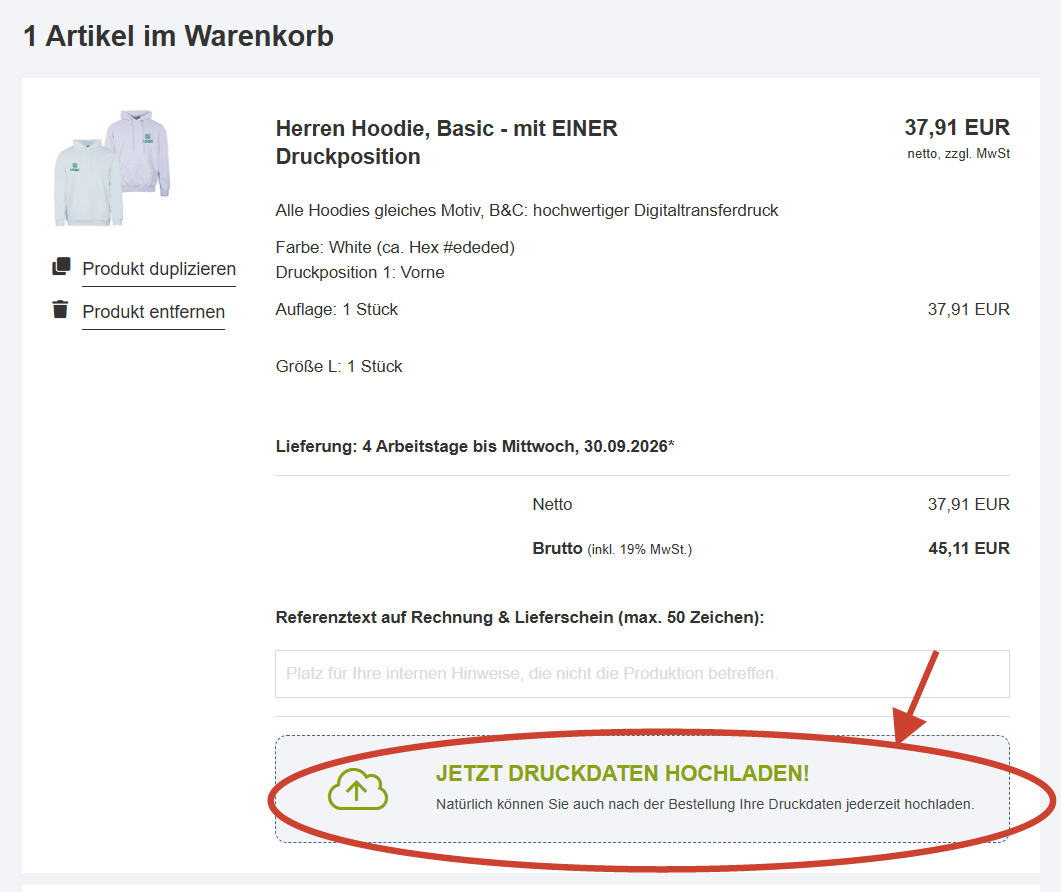
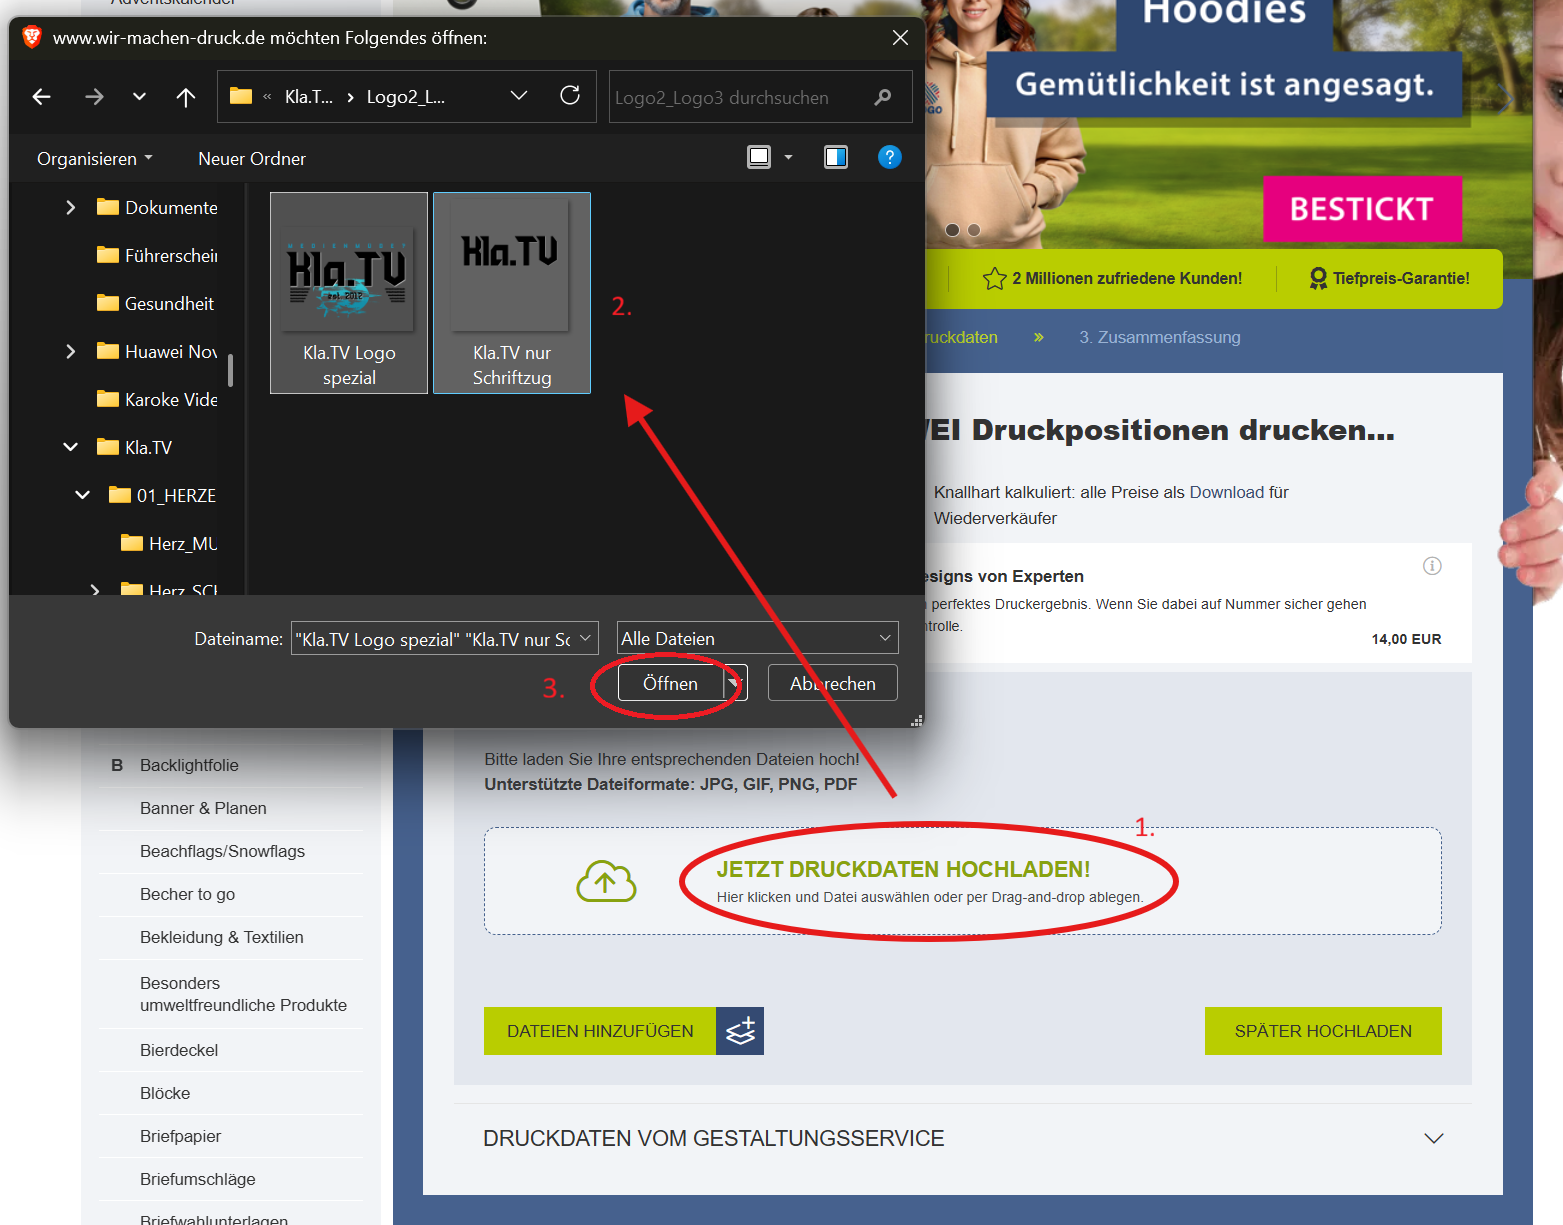
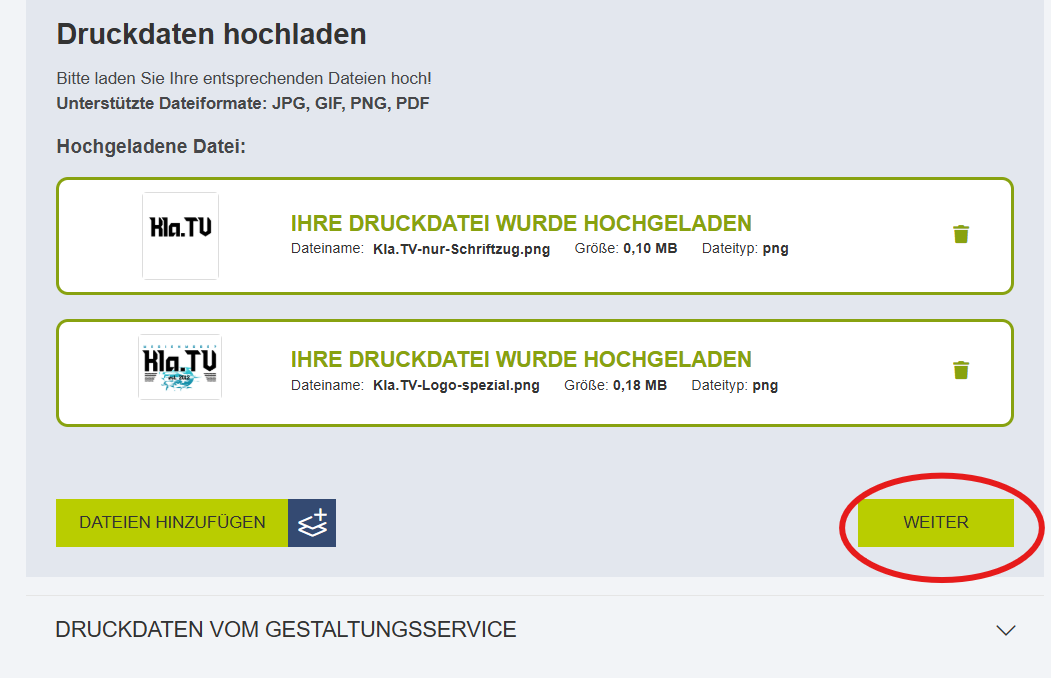
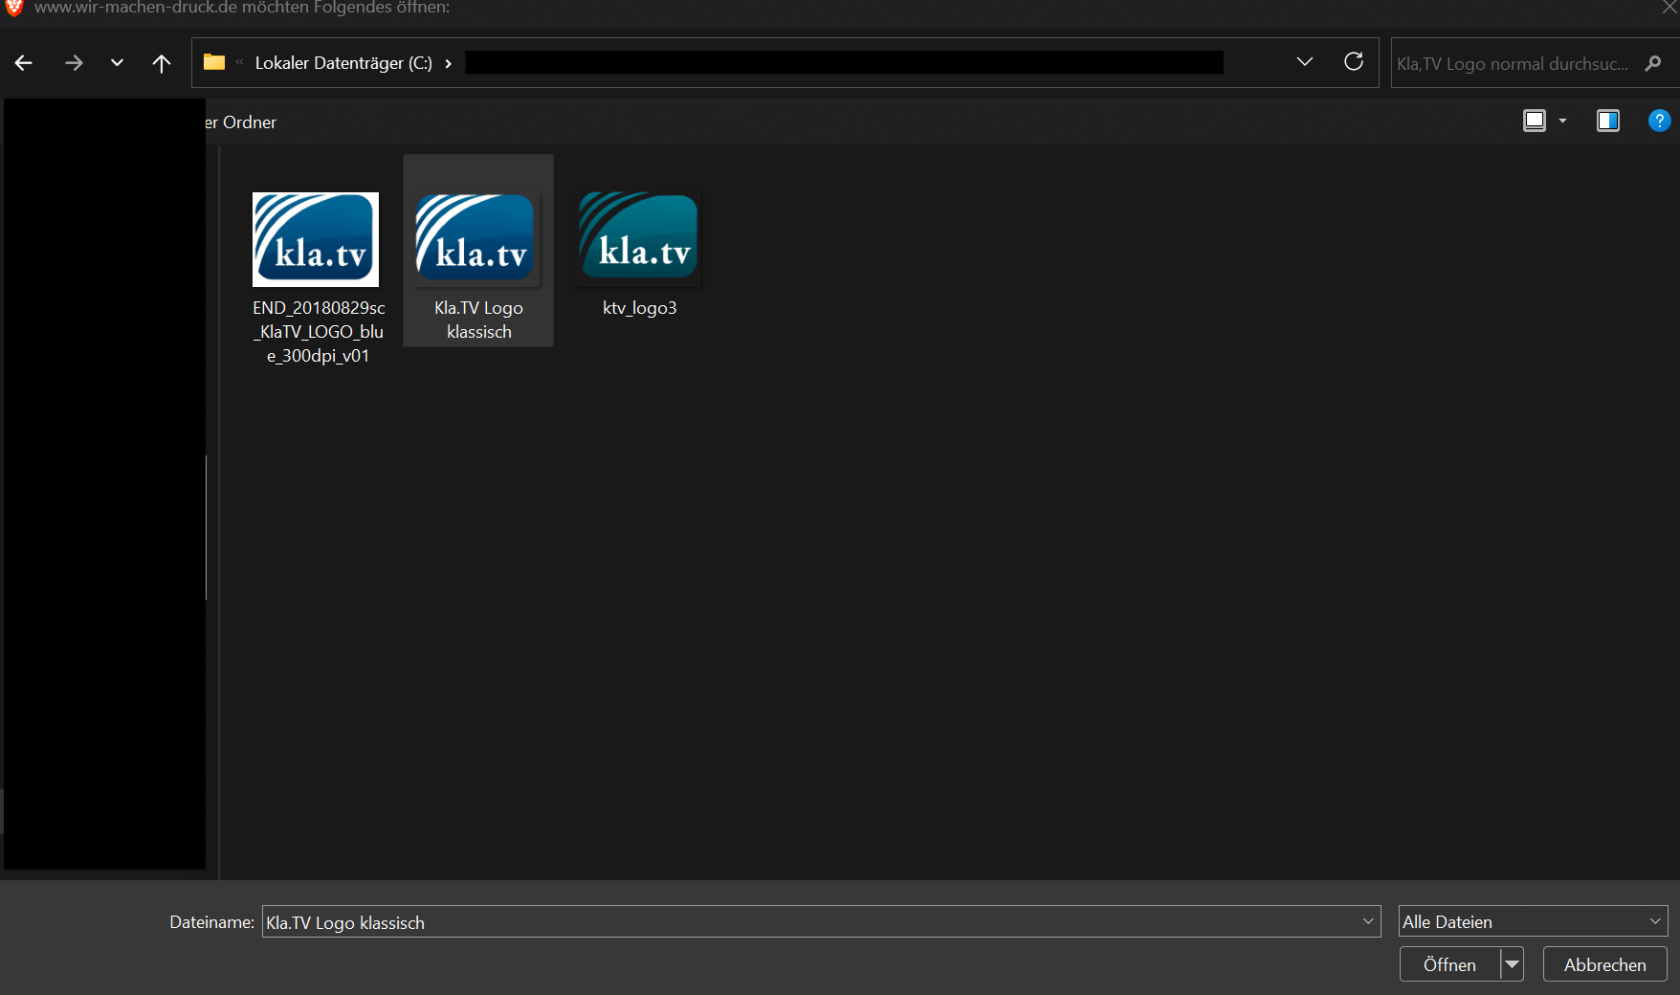
##### <span style="background-color: rgb(251, 238, 184);">**4. Klicke auf "Jetzt Druckdaten hochladen" und lade das in Schritt 1 heruntergeladene Logo hoch**</span>

[![6.4. Schritt Druckdaten.png](https://wiki.kla.tv/uploads/images/gallery/2026-09/scaled-1680-/dB8vmAyGsFOQowME-6-4-schritt-druckdaten.png)](https://wiki.kla.tv/uploads/images/gallery/2026-09/dB8vmAyGsFOQowME-6-4-schritt-druckdaten.png)

[![8. Druckdaten hochladen 2.png](https://wiki.kla.tv/uploads/images/gallery/2026-08/scaled-1680-/WndrEfOEHm3QXgHa-8-druckdaten-hochladen-2.png)](https://wiki.kla.tv/uploads/images/gallery/2026-08/WndrEfOEHm3QXgHa-8-druckdaten-hochladen-2.png)
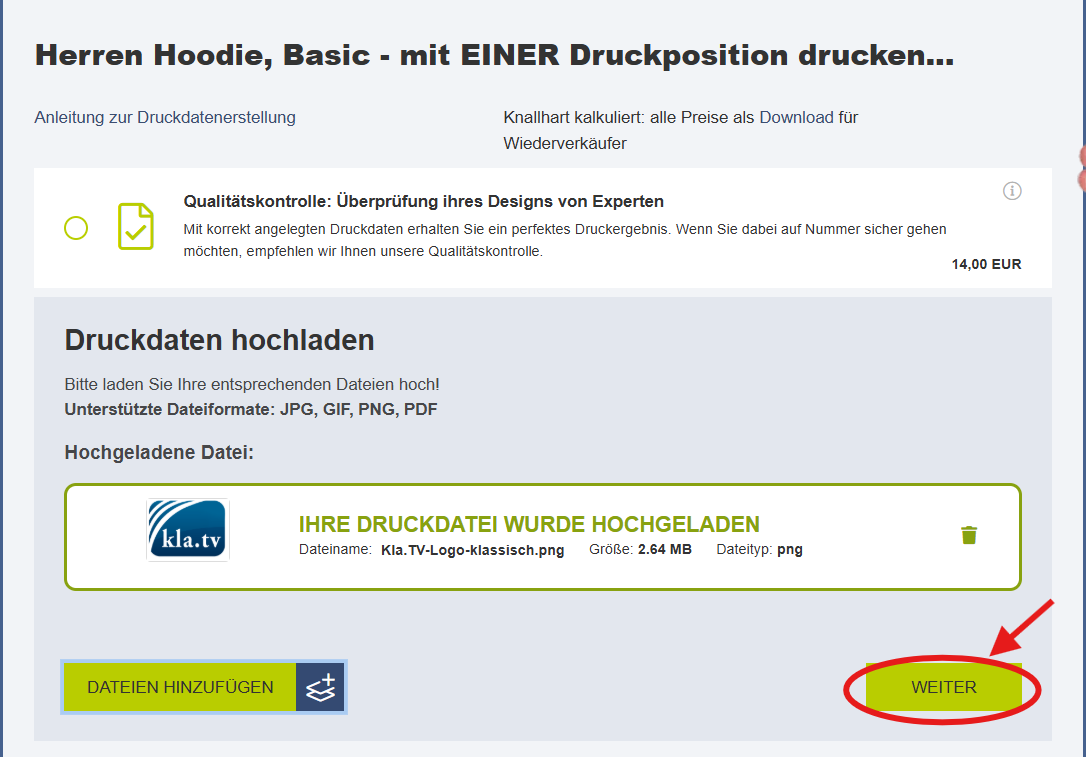
##### <span style="background-color: rgb(251, 238, 184);">**5. Klicke auf "weiter"**</span>

[![6.5. Schritt Weiter.png](https://wiki.kla.tv/uploads/images/gallery/2026-09/scaled-1680-/1yaCWJk2xdtqQhW3-6-5-schritt-weiter.png)](https://wiki.kla.tv/uploads/images/gallery/2026-09/1yaCWJk2xdtqQhW3-6-5-schritt-weiter.png)

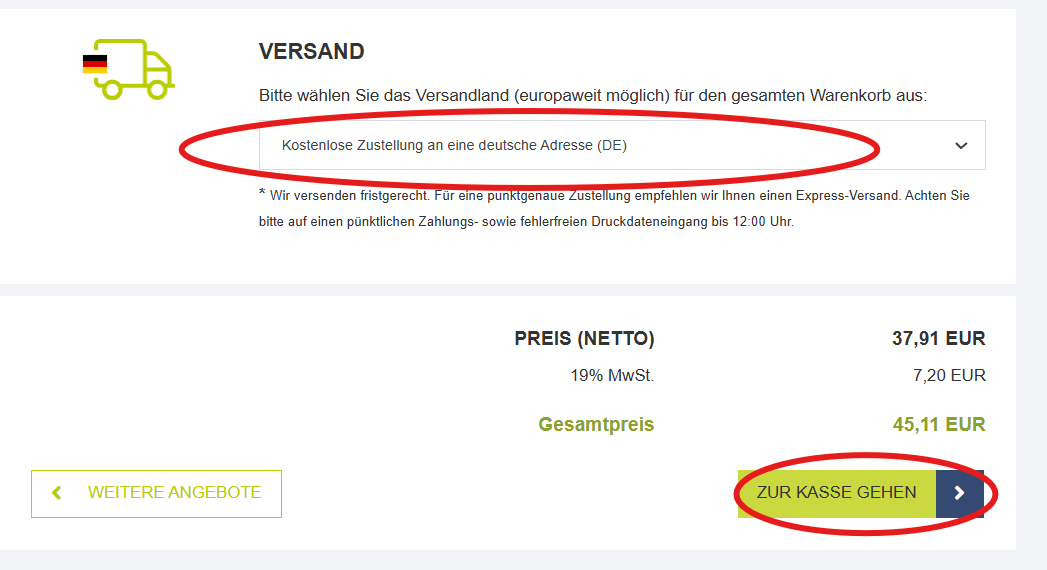
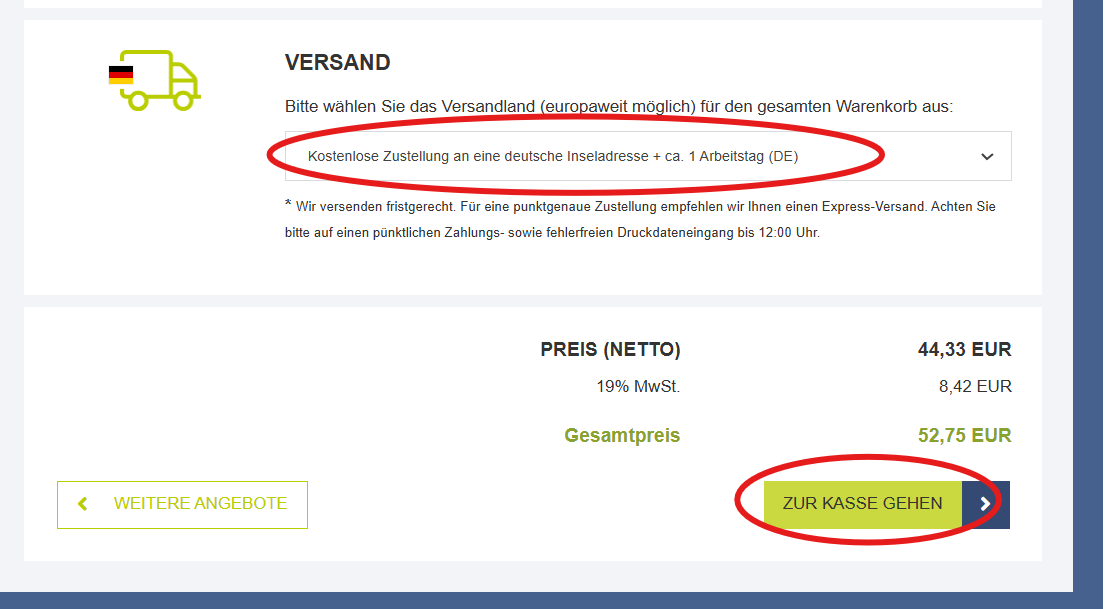
##### <span style="background-color: rgb(251, 238, 184);">**6. Gib das Versandland an und klicke auf "Zur Kasse gehen"**</span>

[![6.6. Schritt Versandland.png](https://wiki.kla.tv/uploads/images/gallery/2026-09/scaled-1680-/px4jWGq27znHaJ4K-6-6-schritt-versandland.png)](https://wiki.kla.tv/uploads/images/gallery/2026-09/px4jWGq27znHaJ4K-6-6-schritt-versandland.png)


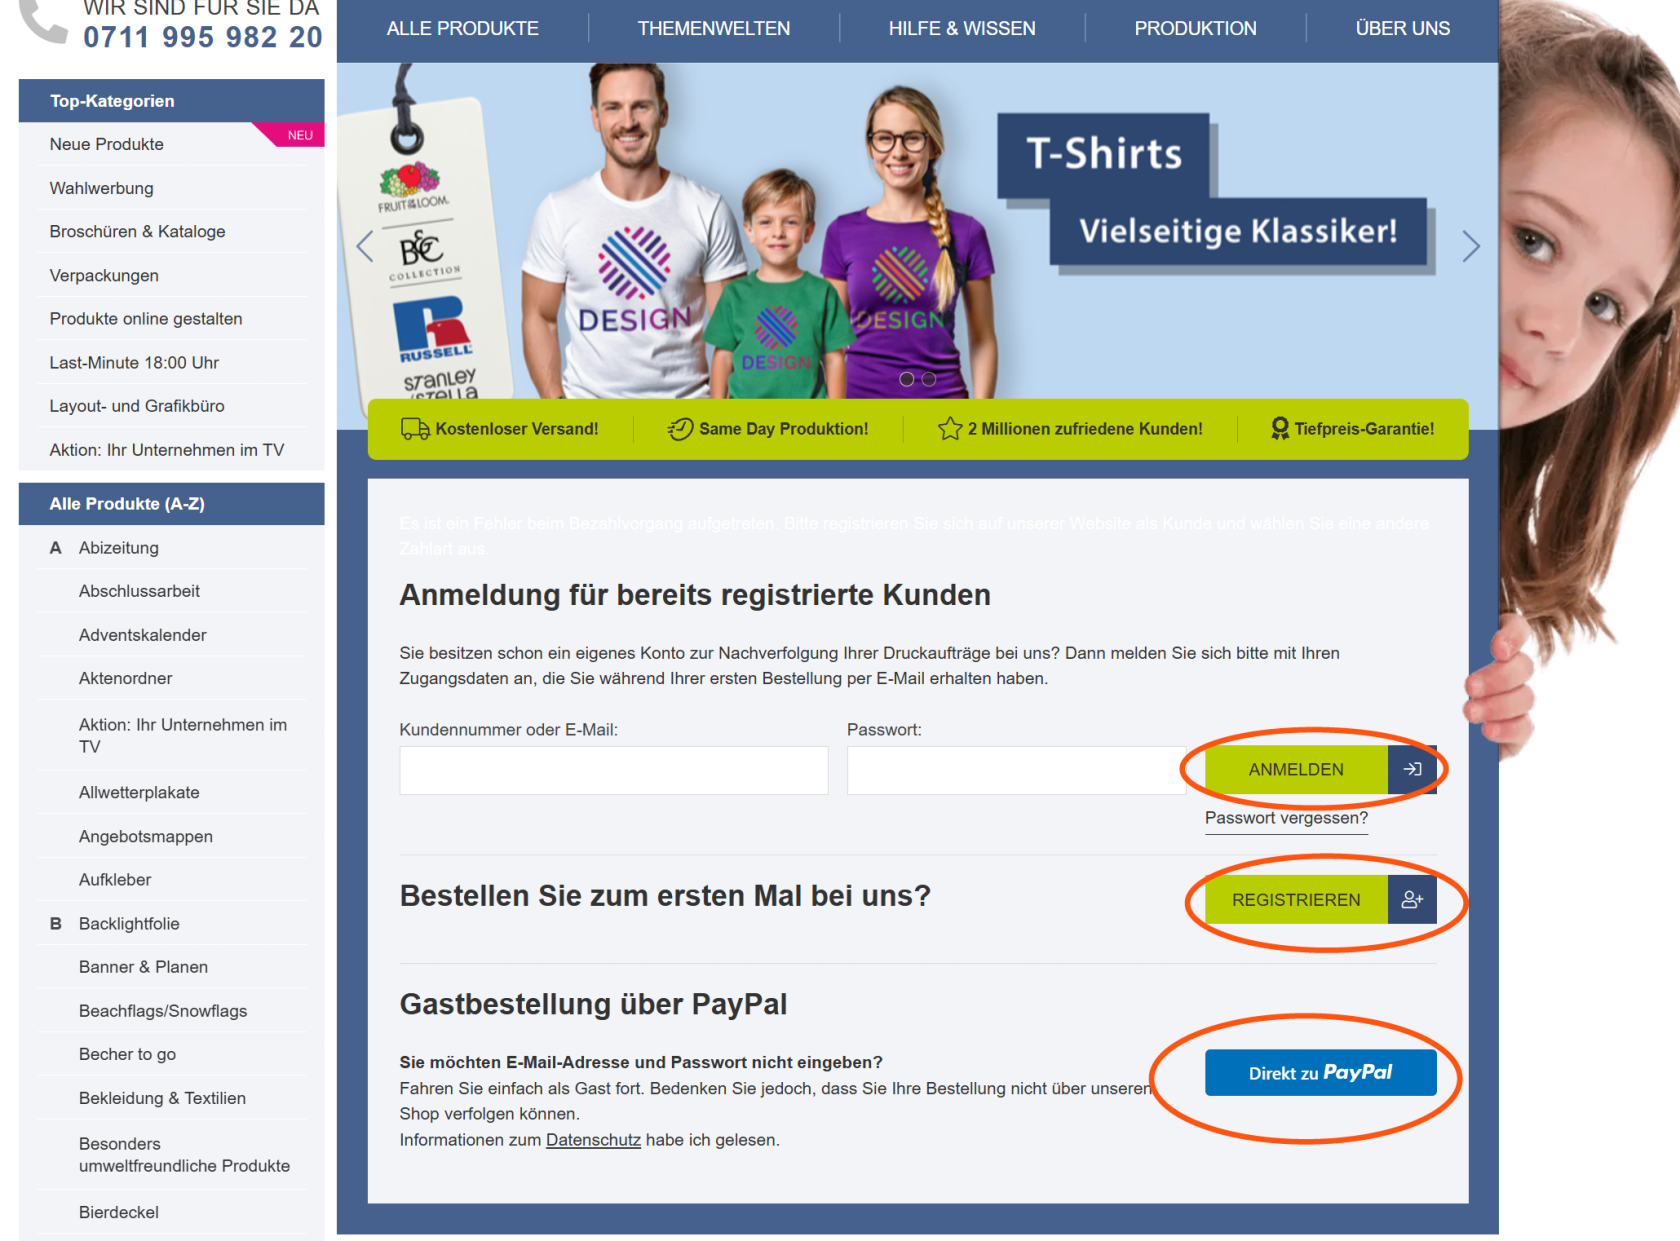
##### <span style="background-color: rgb(251, 238, 184);">**7. Bestelle direkt über Paypal oder erstelle ein neues Konto**</span>

[![10 Bestellung.png](https://wiki.kla.tv/uploads/images/gallery/2026-08/scaled-1680-/PLKoADDj69HGgXDa-10-bestellung.png)](https://wiki.kla.tv/uploads/images/gallery/2026-08/PLKoADDj69HGgXDa-10-bestellung.png)

### <span style="background-color: rgb(248, 202, 198);">BEISPIEL 2</span>

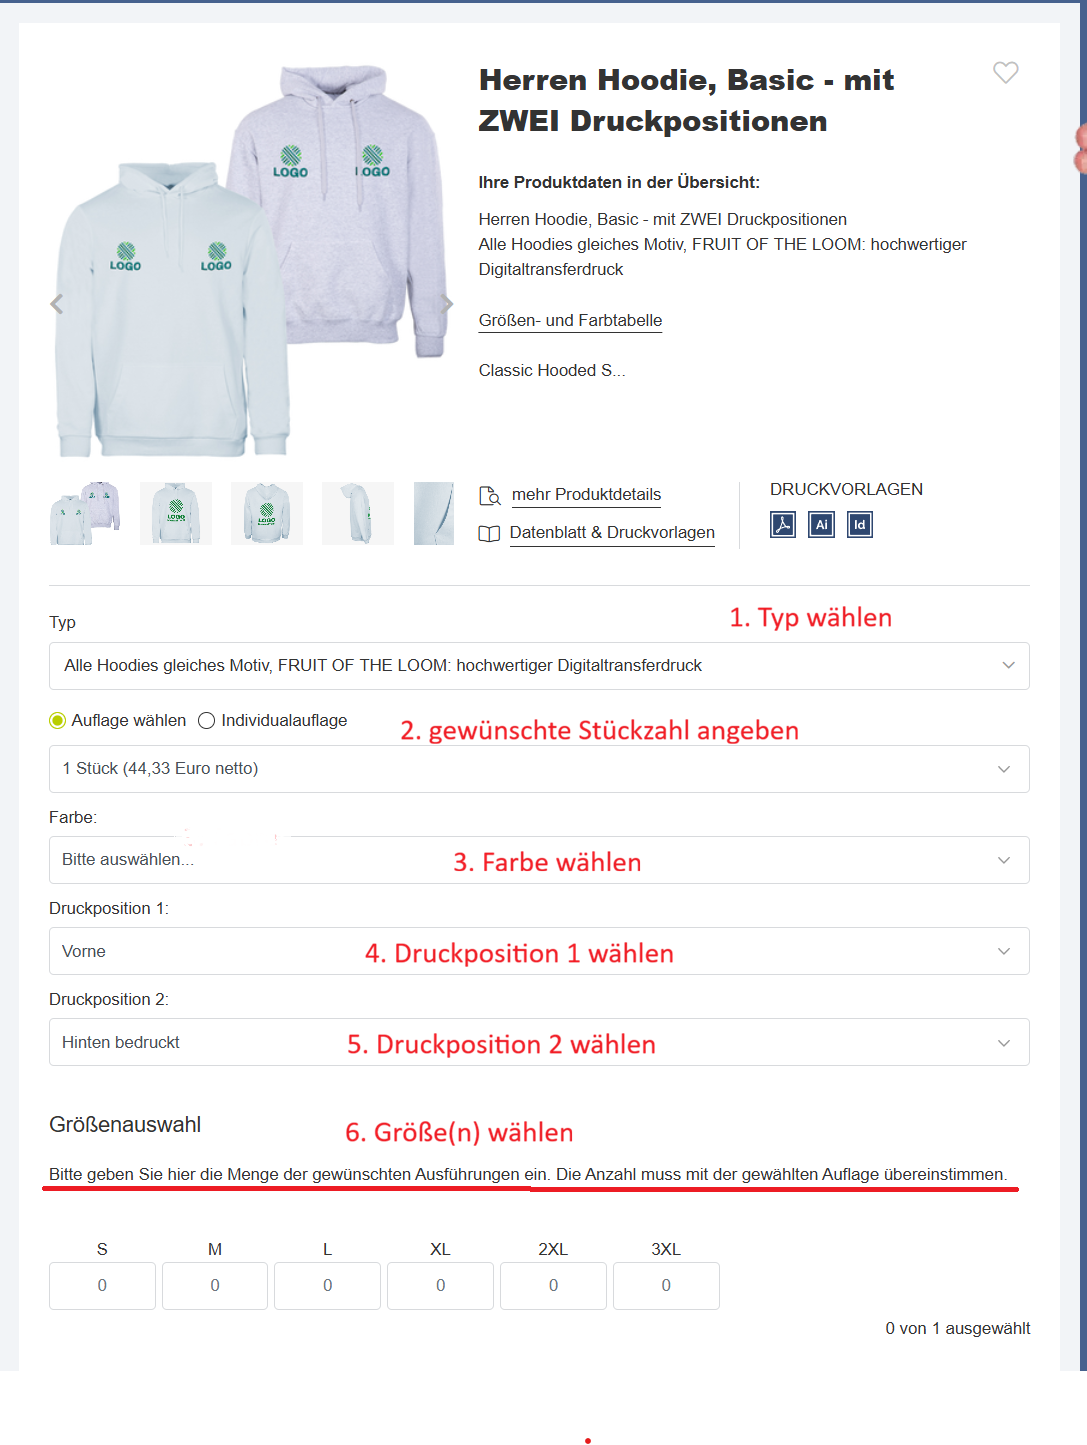
##### <span style="background-color: rgb(251, 238, 184);">**1.Beidseitiger Druck**</span>

Nachdem du nun Schritt **1-5 bei Vorbereitungen** ausgeführt hast, kannst du nun hier die beliebigen Druckdetails für den **beidseitigen** Druck auf einem **Hoodie** angeben.

[![7.1. Schritt Zwei Druckpositonen.png](https://wiki.kla.tv/uploads/images/gallery/2026-09/scaled-1680-/k1ep3yfXUUcZEK1f-7-1-schritt-zwei-druckpositonen.png)](https://wiki.kla.tv/uploads/images/gallery/2026-09/k1ep3yfXUUcZEK1f-7-1-schritt-zwei-druckpositonen.png)
##### <span style="background-color: rgb(251, 238, 184);">**2. Scrolle hinunter und klicke auf "In den Warenkorb"** </span>

[![7.2. Schritt Warenkorb.png](https://wiki.kla.tv/uploads/images/gallery/2026-09/scaled-1680-/xH3TGqq5w0zrPxvF-7-2-schritt-warenkorb.png)](https://wiki.kla.tv/uploads/images/gallery/2026-09/xH3TGqq5w0zrPxvF-7-2-schritt-warenkorb.png)

##### <span style="background-color: rgb(251, 238, 184);">**3. Klicke auf "Jetzt Druckdaten hochladen" und lade die in Schritt 1 heruntergeladenen Logos hoch**</span>

[![7.3. Schritt Motive.png](https://wiki.kla.tv/uploads/images/gallery/2026-09/scaled-1680-/M7EYuquHikwkut60-7-3-schritt-motive.png)](https://wiki.kla.tv/uploads/images/gallery/2026-09/M7EYuquHikwkut60-7-3-schritt-motive.png)

##### <span style="background-color: rgb(251, 238, 184);">**4. Klicke auf "weiter"**</span>

[![7.4. Schritt Weiter.png](https://wiki.kla.tv/uploads/images/gallery/2026-09/scaled-1680-/Zi4JhY9DAyyE8qXL-7-4-schritt-weiter.png)](https://wiki.kla.tv/uploads/images/gallery/2026-09/Zi4JhY9DAyyE8qXL-7-4-schritt-weiter.png)

##### <span style="background-color: rgb(251, 238, 184);">**5. Gib das Versandland an und klicke auf "Zur Kasse gehen"**</span>

[![7.5. Schritt Versand.png](https://wiki.kla.tv/uploads/images/gallery/2026-09/scaled-1680-/J3vdc9zJ1ARUtFv6-7-5-schritt-versand.png)](https://wiki.kla.tv/uploads/images/gallery/2026-09/J3vdc9zJ1ARUtFv6-7-5-schritt-versand.png)

##### <span style="background-color: rgb(251, 238, 184);">**6. Bestelle direkt über Paypal oder erstelle ein neues Konto**</span>

**[![10 Bestellung.png](https://wiki.kla.tv/uploads/images/gallery/2026-08/scaled-1680-/PLKoADDj69HGgXDa-10-bestellung.png)](https://wiki.kla.tv/uploads/images/gallery/2026-08/PLKoADDj69HGgXDa-10-bestellung.png)**

##### <span style="background-color: rgb(251, 238, 184);">**7. Gespannt darauf warten, dass die Bestellung eintrifft**</span>